Spring in Michigan is here, and your RV is ready to come out of hibernation. Before you hit the road, you need to ensure every system runs safely and efficiently after months of freezing temperatures.
Winterizing protects your RV, but it also leaves behind antifreeze, dormant systems, and potential hidden damage. If you skip proper de-winterization, you risk leaks, appliance failure, and costly repairs right when travel season begins.
This guide walks you through a clear, step-by-step process to prepare your RV for spring. You’ll learn how to inspect, flush, test, and refresh every critical system—and why trusting a Michigan RV repair expert ensures lasting results, so you can travel with confidence and avoid unexpected breakdowns.
Inspect RV Exterior after Winter:
When you uncover your RV after a Michigan winter, don’t rush the process. Cold temperatures, snow load, and repeated freeze-thaw cycles quietly stress materials over time. Start from the roof and work your way down so you don’t miss anything critical.
Walk the roof carefully and look for soft spots, cracks, or loose seams. Rubber roofs like EPDM or TPO often develop microfractures around vents, skylights, and AC units. These weak points allow moisture to seep in long before you notice visible damage inside. If sealant looks dry, brittle, or separated, remove it and apply fresh self-leveling lap sealant compatible with your roof type.
Move to the sidewalls and inspect every seam, window edge, and slide-out perimeter. Michigan’s winter air dries out caulking, causing it to shrink and crack. Even a small gap can let spring rainwater enter and create rot behind the walls.
Don’t overlook the undercarriage. Rodents often move into RVs during winter storage. Check wiring, insulation, and storage bays for chew marks or nesting debris. Damaged wiring can lead to shorts or even fire hazards once you power systems back on.
Finally, inspect your tires closely. Cold weather accelerates rubber aging. Look for sidewall cracking, uneven wear, and flat spots from long-term parking. Check tire pressure and compare it to manufacturer specs. Also, verify the DOT date—tires older than 5–7 years should be replaced regardless of tread.
Focus on:
- Roof membrane integrity and sealant condition
- Window, door, and slide-out seals
- Undercarriage and wiring exposure
- Tire condition, pressure, and age
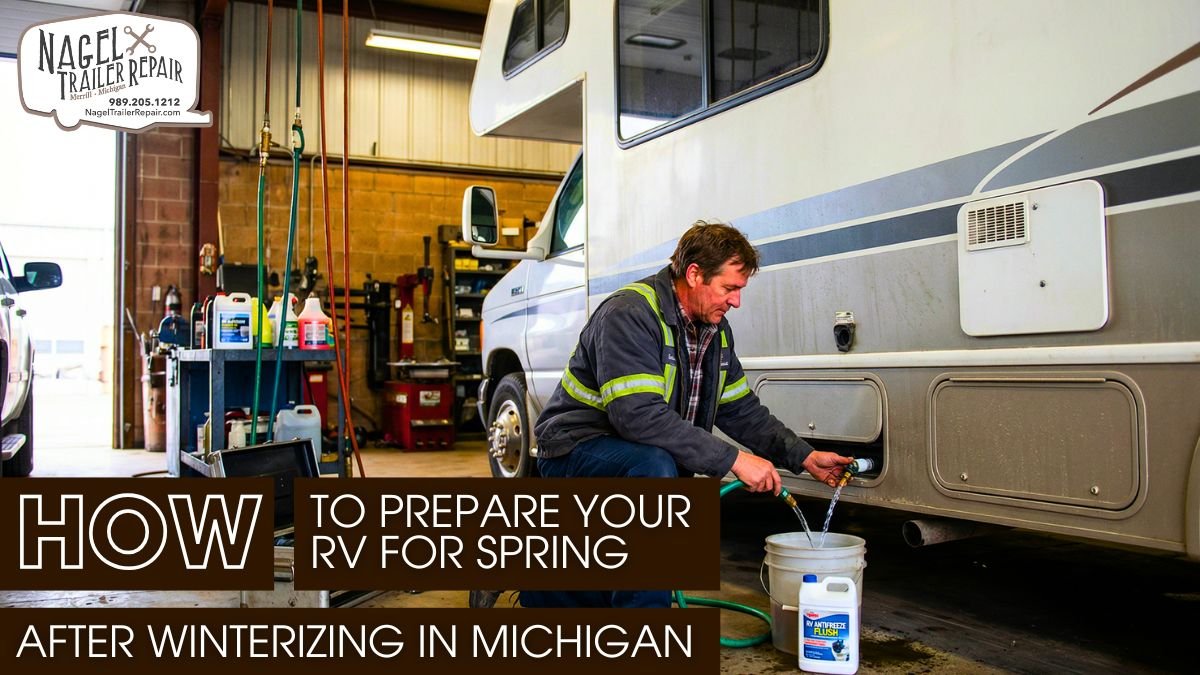
De-Winterize Water System:
De-winterizing your RV’s water system requires more than just turning the water back on. You need to safely remove antifreeze, restore flow, and ensure the system is clean and leak-free.
Start by draining all low-point valves and flushing fresh water through the entire system. Run every faucet—hot and cold—until the pink antifreeze disappears completely. Don’t forget the shower, toilet, and any exterior water connections, since these often retain antifreeze longer.
Next, bring your water heater back online. If you used a bypass kit, reset the valves to normal operation. Reinstall the drain plug or anode rod and inspect it. If the anode rod shows heavy corrosion, replace it to protect the tank from internal rust. Always fill the tank fully before turning on power or gas to prevent dry firing.
Sanitizing the system is essential after months of storage. Bacteria can grow in stagnant water lines. Add a measured bleach solution to your fresh water tank, circulate it through all plumbing lines, and let it sit for several hours. Then flush thoroughly until the chlorine smell is gone.
Once everything is clean, pressurize the system. Use either the onboard pump or a city water connection. Watch for pressure drops and check all fittings, valves, and joints. Even a slow drip can turn into a major issue once you’re on the road.
Key steps:
- Complete antifreeze removal from all lines
- Water heater reactivation and inspection
- Full system sanitization with chlorine solution
- Leak detection under pressure conditions
Test RV Electrical Systems:
After months of inactivity, your RV’s electrical system needs careful attention. Batteries discharge, connections loosen, and corrosion builds up without you noticing.
Start with the batteries. Reconnect them and check voltage with a multimeter. A healthy, fully charged 12V battery should read around 12.6 volts or higher. Clean any corrosion from terminals and ensure tight connections. If you use flooded batteries, check electrolyte levels and top up with distilled water if needed.
Next, inspect your breaker panel and fuse box. Temperature fluctuations can loosen connections over time. Tighten any loose terminals and look for signs of overheating, such as discoloration or burnt smells.
Test every circuit systematically. Turn on all lights, fans, and 12V appliances. Then connect to shore power and test 120V outlets. Use a polarity tester to ensure proper wiring, and confirm that GFCI outlets trip and reset correctly.
If your RV has a generator, don’t skip this step. Old fuel can degrade and cause poor performance. Start the generator and let it run under load for at least 20–30 minutes. Monitor output voltage and listen for irregular operation.
What to check:
- Battery voltage, condition, and connections
- Circuit integrity and breaker panel inspection
- Functional testing of all outlets and fixtures
- Generator load testing and fuel condition
Prepare RV Appliances for Use:
Your RV appliances have been sitting idle all winter, and they need a controlled restart. Dust, debris, and mechanical stiffness can reduce efficiency or cause failures if ignored.
Start with the refrigerator. If it runs on propane, inspect and clean the burner assembly. Dirt or spider webs can block airflow and affect combustion. Test both propane and electric modes and monitor internal temperature until it stabilizes below 40°F.
Move to the furnace and air conditioner. Check for proper airflow and listen for unusual noises. Replace air filters and ensure the blower motor runs smoothly. In the furnace, inspect the combustion chamber for debris that could interfere with ignition.
The propane system requires careful inspection. Hoses and regulators can degrade in cold weather. Use a leak detection solution on all fittings and watch for bubbles. Make sure your propane detector inside the RV is functional and not expired.
In the kitchen, test your stove burners and microwave. A steady blue flame indicates proper combustion. Uneven flames may signal blockages or pressure issues. For the microwave, heat a cup of water to confirm consistent performance.
Important areas:
- Refrigerator cooling efficiency and burner condition
- Furnace and AC airflow and responsiveness
- Propane system leak detection and regulator health
- Functional testing of all cooking appliances
Refresh RV Interior Living Space:
After months in storage, your RV interior needs fresh air and a deep clean. Moisture buildup and stagnant air can affect both comfort and health.
Open all windows, vents, and compartments to ventilate the space. This step removes trapped odors and reduces humidity. Let fresh air circulate for several hours if possible.
Clean every surface thoroughly. Use antimicrobial cleaners on countertops, cabinets, and floors. Pay attention to hidden areas like under cushions, inside closets, and storage compartments where dust and moisture collect.
Inspect for mold and mildew, especially in high-moisture zones like the bathroom and kitchen. If you spot any, treat it immediately and identify the source of moisture to prevent recurrence.
Check furniture and seals as well. Upholstery may have absorbed moisture or developed cracks. Slide-out seals should remain flexible and form a tight barrier when extended.
Interior priorities:
- Full ventilation and air exchange
- Deep cleaning with antimicrobial solutions
- Mold detection and remediation
- Inspection of furniture and sealing components
Final Safety and Road Check:
Before you hit the road, take time to confirm that your RV is fully safe and road-ready. This final step ties everything together.
Test your braking system carefully. For motorhomes, check brake fluid levels and inspect pads and rotors. For towable RVs, connect the brake controller and ensure the brakes respond correctly.
Check engine fluids if your RV is motorized. Inspect oil, coolant, transmission fluid, and brake fluid. Look for signs of contamination, such as milky oil, which may indicate moisture buildup.
Inspect your hitch and towing setup. Make sure the coupler locks securely, safety chains are intact, and all connections meet torque specifications. Lubricate moving parts where needed.
Lastly, confirm that your registration and insurance are up to date. Seasonal policies should be reactivated before you travel.
Final checks:
- Brake system performance and signal testing
- Engine fluids and mechanical condition
- Hitch integrity and towing alignment
- Updated legal and insurance documentation
The Role of Professional Maintenance:
Professional maintenance plays a critical role in keeping your RV reliable through seasonal transitions and extreme weather conditions. While basic checks help, trained technicians use diagnostic tools and hands-on expertise to identify hidden issues like micro-leaks, pressure inconsistencies, or electrical faults that often go unnoticed. They don’t just restore systems—they optimize them for safe, long-term performance.
When dealing with post-winter setup, professionals ensure complete flushing of antifreeze, proper sanitization, and accurate system pressurization. They also inspect seals, roofing materials, and undercarriage components with a trained eye, reducing the risk of moisture intrusion and structural damage. Their approach minimizes the chances of mid-season breakdowns.
For cold-weather preparation, experts focus on insulation efficiency, pipe protection, and proper antifreeze circulation. They also evaluate heating systems and propane safety to ensure consistent performance in freezing conditions. Relying on professional maintenance ultimately saves time, prevents costly repairs, and ensures your RV stays road-ready in every season.
Conclusion:
Bringing your RV out of winter storage in Michigan demands more than a quick inspection. You must approach de-winterization with a technical mindset, ensuring every system—from plumbing to electrical—operates within safe and optimal parameters.
When you follow a structured process, you reduce the risk of hidden failures that often appear during the first trip. Small checks, such as seal inspections or pressure testing, prevent costly repairs and unexpected downtime later.
By investing in proper preparation with a Michigan RV repair expert like Nagel Trailer Repair, you protect your vehicle’s longevity. Ensure every journey starts with total confidence, reliability, and the peace of mind you deserve on the open road.