Water damage can turn a great RV adventure into an expensive repair project. Your roof sealant serves as the first line of defense against leaks, moisture intrusion, and structural deterioration. When sealant sections begin to crack, shrink, or peel, they leave your RV vulnerable to serious damage that can quickly spread beyond the roof surface.
Many RV owners overlook early signs of sealant degradation until stains, mold, or interior water damage appear. Exposure to harsh sunlight, rain, temperature changes, and road vibrations gradually weakens roof sealants, creating gaps that allow water to seep into critical areas. Ignoring these issues often leads to costly repairs and reduced vehicle value.
The good news is that repairing degraded RV roof sealant sections is a manageable task when approached correctly. With guidance from an RV roof expert in Michigan, you can identify damage early, apply durable repairs, and prevent costly leaks. Professional service helps protect your RV, extend roof life, and keep every trip safe and worry-free.
What is an RV Roof Sealant Damage?
RV roof sealants do much more than fill gaps around vents and seams. They form a flexible waterproof barrier that protects the entire roofing system from moisture intrusion. Unlike stationary buildings, RVs constantly move, vibrate, flex, and experience rapid temperature changes. Because of these conditions, roof sealants endure far greater stress than traditional residential sealants.
Most RV roofs use EPDM rubber, TPO membrane, fiberglass, or aluminum materials. Each substrate expands and contracts differently as temperatures fluctuate throughout the day. A quality roof sealant must accommodate these movements while maintaining strong adhesion and flexibility. Over time, however, environmental exposure gradually weakens even the most durable sealants.
Several factors accelerate deterioration:
- Prolonged ultraviolet (UV) exposure
- Extreme temperature fluctuations
- Heavy rainfall and standing water
- Road vibration during travel
- Airborne contaminants and debris
- Natural aging of polymer compounds
As sealants degrade, they begin to lose elasticity. Small surface cracks may appear harmless, but they often signal the beginning of larger waterproofing failures. Once the material hardens, it can no longer move with the roof structure. This loss of flexibility creates stress points that eventually separate from the substrate.
Common warning signs include cracking, shrinking, peeling, bubbling, chalking, and edge lifting. In more advanced cases, water may penetrate beneath the roofing membrane and reach insulation, decking, or structural components. Because moisture often travels before becoming visible, a minor sealant defect can conceal extensive hidden damage.
Understanding how sealants fail helps RV owners recognize problems early and perform repairs before leaks cause expensive structural deterioration.
Inspecting the Roof for Problem Areas:
A successful repair starts with a thorough inspection. Many RV owners focus only on obvious cracks while overlooking adjacent areas that may already be deteriorating. A systematic inspection process provides a complete picture of the roof’s condition and helps prevent recurring leaks.
Begin by inspecting all roof penetrations and transition points. These locations experience the highest levels of movement and environmental exposure. Areas around plumbing vents, skylights, antennas, solar panel brackets, air conditioning units, roof racks, and ladder mounts deserve special attention.
When inspecting the roof, look for:
- Hairline cracking in existing sealant
- Gaps around mounting flanges
- Shrinkage exposing fastener heads
- Soft or discolored roof surfaces
- Areas where sealant has separated from the substrate
- Signs of previous repair failures
Visual inspection alone may not reveal every issue. Use a plastic scraper or non-metallic probe to gently test sealant flexibility. Healthy sealant typically feels resilient and slightly elastic. Degraded material often feels brittle and may crack under light pressure.
Moisture detection tools can significantly improve inspection accuracy. Professional technicians frequently use capacitance moisture meters, infrared imaging equipment, and thermal scanning devices to locate trapped moisture beneath roofing materials. These tools help identify hidden leaks before structural damage becomes severe.
Inspect the roof after rainfall whenever possible. Active moisture exposure often reveals weaknesses that remain hidden during dry conditions. Water pooling near seams or roof penetrations frequently indicates areas that require immediate attention.
Document every damaged section with photographs and notes. Accurate records help prioritize repairs and establish a maintenance history for future inspections.
Gathering Essential Repair Tools:
Using proper tools and materials directly affects repair durability. Even experienced RV owners can experience premature sealant failure if they choose incompatible products or inadequate preparation equipment.
A professional-grade repair setup should include:
- Plastic sealant removal tools
- Quality caulking gun
- Roof-safe cleaning solution
- Isopropyl alcohol
- Microfiber cloths
- Soft-bristle cleaning brushes
- Nitrile gloves
- Utility knife
- Moisture meter
- Inspection flashlight
Choosing the correct sealant requires understanding your roof material. Not all RV sealants work effectively on every roofing substrate. Manufacturers formulate sealants with specific adhesion characteristics to ensure compatibility with particular membrane types.
Self-leveling sealants work best on horizontal roof surfaces because they naturally flow into gaps and irregularities. Non-sag formulations maintain shape on vertical surfaces and sidewall transitions.
Different roof systems require different products:
- EPDM roofs require EPDM-compatible lap sealants.
- TPO membranes require TPO-specific formulations.
- Fiberglass roofs often perform well with polyurethane sealants.
- Aluminum roofs frequently benefit from hybrid polymer technologies.
Modern hybrid sealants combine the strengths of silicone, polyurethane, and advanced polymer chemistry. These products offer superior UV resistance, high elongation ratings, and exceptional weathering performance. Many premium formulations can stretch several times their original dimensions without cracking, making them particularly effective for RV applications.
Investing in quality materials typically produces longer-lasting repairs and reduces future maintenance requirements.
Removing Old and Damaged Sealant:
Proper removal of deteriorated sealant remains one of the most critical steps in the repair process. Many failed repairs occur because new sealant was applied directly over compromised material. Even the best sealant cannot establish a reliable bond when the underlying surface is unstable.
Start by cleaning the repair area thoroughly. Dirt, oxidation, mold, mildew, and road contaminants interfere with adhesion and reduce sealant performance. Use a manufacturer-approved cleaner to remove all surface contamination.
After cleaning, carefully remove damaged sealant using plastic scrapers. Avoid metal tools whenever possible because they can puncture membranes and create additional leak points.
Focus on removing:
- Loose sealant sections
- Cracked material
- Brittle areas
- Detached edges
- Contaminated sealant surfaces
During removal, inspect the substrate beneath the sealant. Water intrusion frequently causes hidden deterioration that becomes visible only after the sealant has been removed.
Watch for:
- Delaminated roof decking
- Corroded fasteners
- Wet insulation
- Mold growth
- Membrane separation
- Structural soft spots
Address these issues before proceeding with the repair. Simply covering damaged components with fresh sealant may temporarily stop leaks, but it will not solve underlying structural problems.
After removing all compromised material, perform a final surface preparation using isopropyl alcohol or a manufacturer-approved cleaning agent. This step removes residual oils and contaminants that could interfere with bonding. Allow the area to dry completely before applying new sealant.
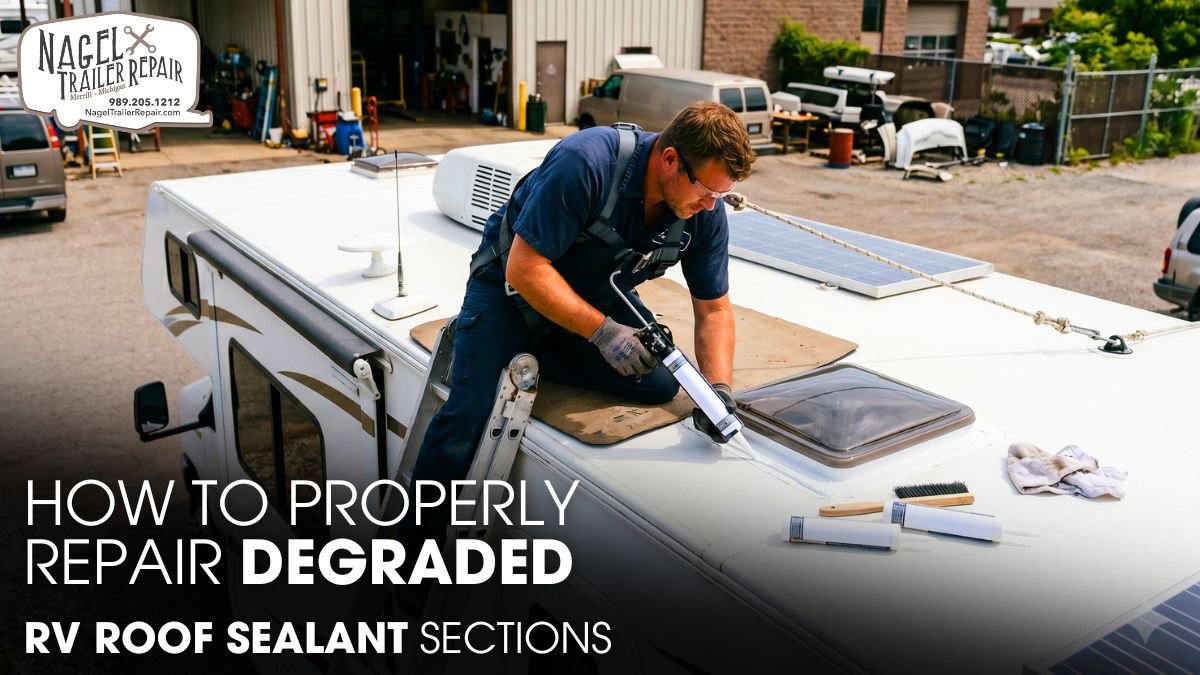
Applying New RV Roof Sealant:
Proper application techniques determine whether a repair lasts for months or for years. Even premium sealants require correct installation procedures to achieve their full performance potential.
Before opening the sealant cartridge, verify that environmental conditions meet manufacturer recommendations. Most products require dry surfaces and moderate temperatures for proper curing. Excessive humidity, cold temperatures, or direct moisture exposure can negatively affect adhesion and curing performance.
Before application:
- Confirm surface cleanliness
- Verify substrate dryness
- Inspect surrounding materials
- Review manufacturer instructions
- Ensure complete removal of damaged sealant
Apply the sealant using a steady, continuous bead. Consistency is critical because uneven application can create weak points that allow moisture infiltration. Avoid stopping and restarting whenever possible.
For self-leveling sealants, allow the material to flow naturally. Excessive tooling may trap air bubbles or create thin spots within the waterproof barrier. For non-sag products, use a finishing tool to create smooth transitions and ensure complete contact with the substrate.
Pay special attention to:
- Fastener encapsulation
- Flange edges
- Roof penetrations
- Seam intersections
- Transition points between materials
Sealant performance depends heavily on curing. During the curing process, polymer chains cross-link and develop their final mechanical properties. Disturbing the repair too early can weaken adhesion and reduce long-term durability.
After curing, inspect the repair carefully. Verify complete coverage, proper edge bonding, and uniform thickness. A properly installed repair should form a seamless, flexible waterproof barrier capable of accommodating future roof movement.
Maintaining Repaired Sealant Sections:
Repairing degraded sealant solves the immediate problem, but long-term roof protection requires ongoing maintenance. Routine inspections and preventive care significantly extend the life of both the sealant and the roofing system.
Industry professionals generally recommend inspecting RV roofs every three to six months. Additional inspections should occur after severe storms, hail events, long storage periods, or extended travel.
An effective maintenance program should include:
- Scheduled roof inspections
- Regular cleaning procedures
- Drainage evaluations
- Moisture monitoring
- Immediate repair of minor defects
- Documentation of maintenance activities
Keep the roof free from leaves, dirt, branches, and debris. Organic materials retain moisture and accelerate sealant degradation. Standing water also increases hydrostatic pressure and can expose weaknesses in repaired areas.
UV radiation remains one of the most destructive environmental factors affecting sealants. When approved by the roof manufacturer, protective coatings and UV-resistant maintenance products can help slow aging and preserve flexibility.
Maintain detailed service records that include inspection dates, repair locations, materials used, and observations. Historical records make it easier to identify recurring issues and improve long-term maintenance planning.
Most importantly, address minor defects as soon as they appear. A small crack may seem insignificant today, but it can quickly develop into a major leak that damages insulation, decking, and structural components. Consistent maintenance remains the most cost-effective strategy for preserving RV roof integrity and avoiding expensive repairs.
The Role of Professional Maintenance:
Professional maintenance plays a vital role in protecting an RV’s condition, performance, and long-term value. Skilled technicians can identify early signs of roof deterioration, sealant failure, moisture intrusion, and structural wear before they develop into costly repairs. Regular inspections help ensure that critical components remain properly sealed, reducing the risk of water damage and extending the lifespan of the vehicle.
Maintenance professionals also help owners make informed financial decisions by evaluating repair needs and recommending practical protection plans. Their expertise can prevent unnecessary expenses, improve repair efficiency, and support better RV insurance coverage choices when unexpected damage occurs.
By combining preventive maintenance with appropriate financial protection, RV owners can reduce risks, control ownership costs, and enjoy greater confidence during every journey.
Conclusion:
Properly repairing degraded RV roof sealant sections requires careful inspection, thorough surface preparation, correct material selection, and precise application techniques. While sealant deterioration is a natural part of RV ownership, proactive maintenance and timely repairs can prevent leaks, protect structural components, and extend the lifespan of the entire roofing system.
Protecting your RV starts with timely roof care. By understanding how sealants fail and using proven repair methods from Nagel Trailer Repair, owners can prevent costly damage. Trust an RV roof expert in Michigan to restore watertight protection, extend roof life, and keep every journey worry-free.