Water stains on your RV ceiling can quickly turn into dangerous mold growth if you ignore them. Mold spreads fast, damages walls and insulation, and creates unhealthy air inside your camper. Even a small roof leak can lead to costly repairs and long-term moisture problems.
Many RV owners struggle to remove mold completely because they only clean the surface while hidden moisture remains trapped underneath. Without fixing the roof damage first, mold often returns and continues to weaken the interior structure of the RV.
This guide will show you how to remove mold from RV roof damage safely. Learn to locate leaks, clean, repair, and prevent regrowth—but for lasting protection, trust an RV roof expert in Michigan to avoid costly future repairs.
Signs of Mold From RV Roof Leaks:
Most RV mold problems start quietly. A tiny crack in the roof seal or a loose vent flange may not seem serious at first, but once water enters the roof structure, the damage spreads quickly. Moisture moves through insulation, ceiling panels, plywood decking, and wall cavities long before visible mold appears inside the RV.
One of the earliest warning signs is a musty smell that does not go away. Many RV owners notice this odor after rainfall or during humid weather. That smell usually means mold spores have already started growing behind walls, beneath flooring, or inside roof insulation. Because RVs have compact interiors with limited airflow, trapped moisture creates the perfect environment for microbial growth.
You should also watch for visible signs of water intrusion. Brown ceiling stains, bubbling wallpaper, swollen wall panels, warped wood trim, and soft spots around roof openings often indicate ongoing roof leaks. In severe cases, water saturation causes plywood roof decking to delaminate and weaken structurally.
Pay close attention to these high-risk areas:
- Roof vent openings
- Skylight edges
- Air conditioner mounts
- Front and rear roof seams
- Ladder attachment points
- Antenna and solar panel brackets
A moisture meter can help confirm hidden water damage before mold becomes visible. Most dry RV wall materials show moisture readings below 15%. If readings climb above 20%, you likely have active moisture intrusion that requires immediate attention.
Ignoring early symptoms can lead to serious structural damage. Mold does not stay isolated to one spot. It spreads through insulation fibers, wood framing, and HVAC ducting, eventually affecting indoor air quality throughout the RV.
Find the Source of Roof Damage:
Before removing mold, you must identify the exact source of the leak. Many RV owners clean visible mold but fail to repair the water entry point, allowing moisture to continue feeding hidden mold colonies behind walls and ceilings.
Most RV roof leaks occur around penetrations rather than across the main roof membrane itself. Roof-mounted components constantly shift during travel due to vibration, road flex, and thermal expansion. Over time, sealants crack and fasteners loosen, creating small openings where water can enter.
Inspect the roof carefully and look for:
- Cracked or brittle lap sealant
- Loose mounting screws
- Torn EPDM or TPO membrane sections
- Dried butyl tape
- Gaps around skylights and vents
- UV-damaged caulking
Water often travels several feet away from the actual leak source before appearing inside the RV. For example, a leak near the front cap may eventually drip through a cabinet or ceiling panel much farther away. This makes leak tracing more technical than many owners expect.
A controlled water test works well for locating hidden leaks:
- Close all doors and windows
- Use a standard garden hose
- Spray one roof section at a time
- Start low and move upward slowly
- Check the interior after each section
Avoid pressure washers because they can force water beneath roof seams and create additional damage. If you cannot find the leak visually, thermal imaging cameras and moisture detection tools can help locate saturated roof decking and insulation.
Many professional RV repair shops use infrared scanning because it identifies hidden moisture without removing interior panels. Finding the exact leak source saves time, prevents repeat repairs, and ensures mold remediation actually solves the problem.
Prepare the RV for Mold Removal:
Proper preparation is critical before you begin mold cleanup. Disturbing mold without containment can spread spores throughout the RV and contaminate clean areas. Start by disconnecting shore power and shutting down nearby electrical circuits.
Water-damaged wiring can create electrical hazards during remediation, especially near roof air conditioners, ceiling lighting, or inverter systems. Next, remove porous materials that absorbed moisture for extended periods. Mold roots penetrate deeply into soft materials, making complete cleaning almost impossible in many cases.
Common materials that often require removal include:
- Carpet padding
- Upholstered cushions
- Ceiling insulation
- Fabric curtains
- Pressboard furniture
- Wet mattresses
You should also wear proper protective equipment throughout the process. Mold spores can irritate the lungs, eyes, and skin, especially in enclosed RV interiors where ventilation remains limited.
Recommended safety gear includes:
- N95 or P100 respirators
- Sealed eye protection
- Nitrile gloves
- Disposable coveralls
- HEPA-filter air scrubbers
Ventilation management plays a major role during remediation. Open roof vents and windows while using exhaust fans to direct contaminated air outside. If possible, create negative air pressure so spores do not spread into unaffected areas.
Humidity control matters as well. Mold grows aggressively when humidity exceeds 60%, so use a dehumidifier during cleanup to keep interior moisture levels under control. High-velocity drying fans can also help remove trapped moisture from structural cavities after contaminated materials are removed.
Never use a regular household vacuum for mold cleanup. Standard vacuums release microscopic spores back into the air. Instead, use a HEPA-filter vacuum designed specifically for remediation work.
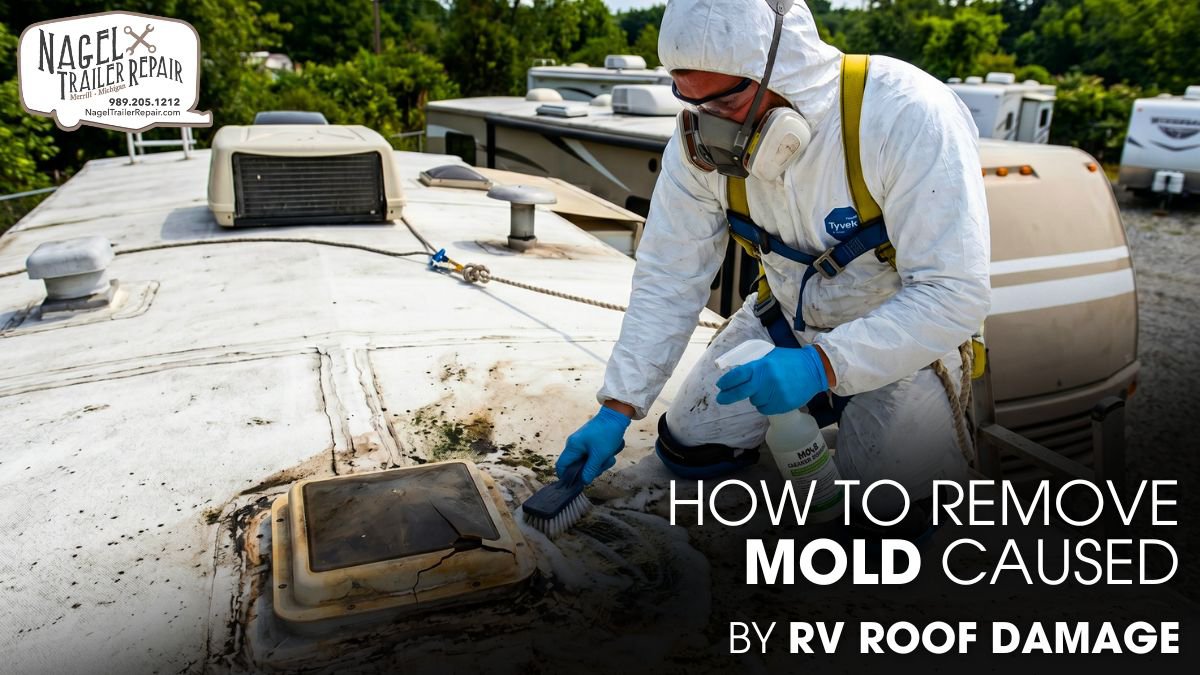
Remove Mold Safely and Effectively:
The right mold removal approach depends on how far the damage has spread inside the RV. You can usually clean surface mold from fiberglass or vinyl panels with proper products, but soaked wood and insulation often need full replacement to stop future growth.
Start the process by removing loose spores with a HEPA vacuum to keep them from spreading through the air. Once you finish vacuuming, spray an RV-safe antimicrobial cleaner on the affected areas and wipe the surfaces thoroughly to remove remaining mold safely.
Hydrogen peroxide-based products work especially well on:
- Vinyl wall coverings
- Fiberglass surfaces
- Aluminum framing
- Plastic trim panels
Avoid relying entirely on bleach. Although bleach removes surface stains, it cannot fully penetrate porous materials like wood or insulation. In some cases, bleach may even leave behind moisture that encourages additional mold growth later.
For wood framing or plywood decking, scrub the affected area thoroughly and allow it to dry completely. If the wood remains soft, swollen, or structurally weak after drying, replace it immediately. During remediation, remove contaminated materials at least 12 inches beyond visible mold growth because spores often spread farther than surface staining suggests.
Important remediation steps include:
- Drying all surfaces completely
- Replacing saturated insulation
- Cleaning HVAC ducts and vents
- Disinfecting exposed framing
- Monitoring moisture readings daily
Roof air conditioners deserve special attention because mold frequently develops inside evaporator compartments and duct channels. Clean these systems carefully using coil-safe antimicrobial treatments and replace all filters afterward.
Large infestations may require professional remediation services, especially if:
- Mold covers more than 10 square feet
- Black mold appears widespread
- Structural framing feels weak
- HVAC contamination becomes severe
- Occupants experience respiratory symptoms
Removing mold completely takes patience and proper drying procedures. If any moisture remains trapped behind walls or ceilings, mold will likely return.
Repair the RV Roof Damage:
After removing the mold, repair the entire roof system properly to stop future damage. Permanent repairs protect your RV from leaks, moisture buildup, and structural problems. Quick fixes and temporary patches often fail because constant vibration, harsh sunlight, and changing temperatures weaken them over time. A durable repair keeps the roof stable and extends its lifespan.
You should also inspect the roof carefully before starting repairs. Different RV roof materials require different repair methods, tools, and sealants. Using the correct repair process helps maintain the roof’s strength, improves weather protection, and prevents mold from returning.
Most RVs use one of these roofing systems:
- EPDM rubber roofing
- TPO membrane roofing
- Fiberglass roofing
- Aluminum roofing panels
Each roofing material requires compatible adhesives and sealants. Using the wrong sealant can damage the roof membrane or cause premature bond failure.
Begin by removing old sealant completely. Clean the roof surface thoroughly to remove dirt, oxidation, oils, and loose debris before applying new materials. If water damaged the roof decking underneath, partial roof reconstruction may become necessary.
This process usually includes:
- Removing the roof membrane
- Cutting out rotten plywood
- Replacing damaged framing
- Installing new insulation
- Reapplying membrane adhesive
- Sealing all roof penetrations
Marine-grade plywood offers better moisture resistance than standard plywood and works well for RV roof repairs. Closed-cell foam insulation also performs better than fiberglass insulation because it absorbs less moisture.
When reinstalling roof fixtures, apply butyl tape beneath mounting flanges before tightening fasteners. Then use self-leveling lap sealant around exposed edges to create a watertight seal.
After completing repairs, perform another controlled water test and check all repaired areas with a moisture meter. Moisture readings should stabilize below 15% before reinstalling interior ceiling panels or insulation.
Prevent Mold From Returning:
Prevent future mold problems by maintaining your RV roof regularly and controlling interior moisture levels. Even after professional repairs, hidden leaks can allow mold to return if you ignore small signs of damage for too long. Check ceilings, corners, and vents often to catch moisture early and avoid costly repairs later.
Inspect the roof every few months and immediately after heavy storms. Constant sun exposure, road movement, and changing temperatures gradually weaken sealants and roofing materials. Repair cracks, reseal damaged areas, and keep the roof clean to protect your RV from water intrusion and mold growth.
Your maintenance routine should include:
- Inspecting roof seams regularly
- Cleaning debris from drainage areas
- Checking vent and skylight seals
- Monitoring indoor humidity levels
- Examining ceiling panels for stains
Keep interior humidity between 30% and 50% whenever possible. Cooking, showering, and wet clothing can raise humidity levels quickly inside an RV, especially during cold weather.
Using these tools can help control moisture:
- Roof vent fans
- Portable dehumidifiers
- Moisture absorbers
- Digital humidity monitors
Store your RV under a covered shelter to lower the risk of mold growth. Avoid covering it with airtight plastic tarps because they trap moisture and create condensation, which can lead to mold and mildew problems over time.
During long-term storage:
- Leave roof vents slightly open
- Remove standing water from the roof
- Place moisture absorbers inside cabinets
- Inspect roof seals before storage season
- Check for condensation around windows
Modern wireless moisture sensors help RV owners detect hidden leaks before they turn into serious problems. These smart systems track moisture and humidity levels in real time and send early alerts when they notice unusual changes. By monitoring conditions continuously, owners can respond quickly and stop water damage from spreading inside walls, ceilings, or flooring.
Remote monitoring also makes maintenance easier and more effective. Instead of waiting for visible signs of mold, owners can identify damp areas early and fix leaks before mold growth begins. This proactive approach protects the RV interior, improves air quality, and helps reduce costly repairs over time.
The Role of Professional Maintenance:
Professional RV maintenance plays a major role in protecting your roof from long-term damage caused by moisture, extreme heat, and aging materials. Experienced technicians can detect small cracks, weakened sealants, hidden leaks, and early signs of roof membrane failure before they become serious structural problems.
They also use moisture meters and thermal inspection tools to identify trapped water inside roof decking and insulation that many owners cannot spot during routine checks. Regular professional inspections help maintain proper roof ventilation, improve seal performance, and reduce the risk of mold growth during humid conditions.
During hot summers, technicians can also apply UV-protective roof coatings that minimize heat absorption, prevent membrane cracking, and extend the lifespan of your RV roof system.
Conclusion:
Mold caused by RV roof damage can quickly escalate from a minor maintenance issue into a serious structural and health hazard. Water intrusion weakens roof decking, destroys insulation, contaminates air systems, and accelerates interior deterioration.
Effective remediation requires more than surface cleaning. You must locate the exact leak source, eliminate trapped moisture, remove contaminated materials safely, and restore the roof system using proper repair methods. Technical inspection tools, controlled drying procedures, and compatible roofing materials all play critical roles in successful long-term remediation.
By following a preventive maintenance schedule, monitoring roof condition regularly, and trusting Nagel Trailer Repair—a true RV roof expert in Michigan—you can avoid expensive structural repairs, ensure a dry, safe, mold-free home, and stay motivated to act before leaks begin.